I think a lot of people have the wrong idea about Valentine’s day. In my opinion, it shouldn’t just be about boyfriends, girlfriends, husbands and wives. I think it’s a good time to spread the love to friends, co-workers, teachers and family. I mean why not? I find that giving a little love in all directions reminds me how loved I am too; it’s such a wonderful thing, and what better time to do that then on V-day?
So here’s a last minute Valentine craft for you. This is super easy and quick in case you need to whip up a few heartfelt cards in a jiffy.
All you need are:
Cupcake wrappers in 2 different colors/patterns (I’d opt for red or pink!)
Cardstock
Embroidery thread and needle
Sharpie
Scissors
A medium sized button

Simply take one of your cupcake wrappers, turn it inside out and cut slits about 1/2 an inch apart all the way around. Just cut strait down from the outside to the center (just to where the flat part begins.) Set it aside.
Now take a second cup, again turn it inside out and pinch the very center of the paper and pull it down. Then begin to twist the pinched part. You’re basically creating a smaller, ruffled flower by pinching and twisting the crimped part of the wrapper together. (See pictures below.)
Tape the twisted part down to the back of the flower so that it maintains its shape. Next thread your needle with your embroidery thread and sew your button in the center of the two wrappers, with the pinched wrapper on top of the first wrapper.

As you can see, I cut scallops around the edges of the first wrapper; It looks fine without the extra scallops, but they do punch up the petal look if you want to do that too!
Now you could add a piece of card stock to the back of the flower and make a cute brooch, corsage or hair clip….The possibilities are pretty endless, but I opted to use it to embellish a card. To do this, simply fold your card stock in half and cut to the size card you want. Using the same thread from before, stitch the flower to the front of the card (careful not to sew all the way through) and continue to make stitches for a stem. I also stitched a heart, but in doing it freehand, I wasn’t too keen on how it turned out. It may be a good idea to pencil sketch your design first (lesson learned!)
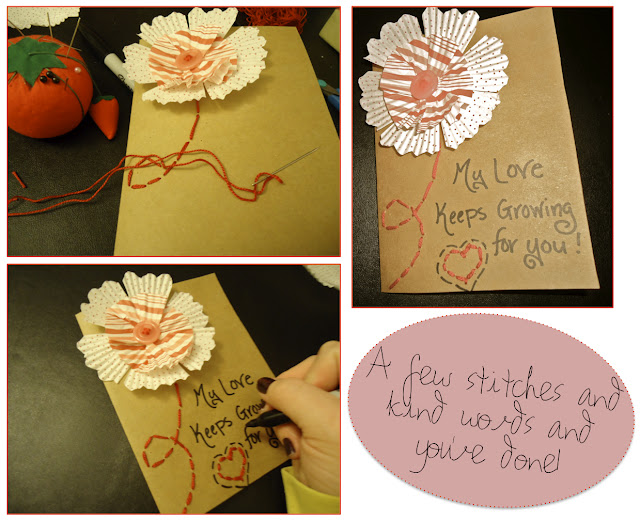
Finally, use your sharpie to write your special message. I am giving this card to my husband, so I went with a rather romantic sentiment, but you could use phrases like “Let Love Bloom,” or “Friends are like Flowers,” or even the classic “Happy Valentine’s Day!”
As a final finish, glue another piece of matching cardstock to the inside cover of the card. This will give it more stability and hide your stitches.
Hope you all have a wonderful Valentine’s Day and Happy Crafting!
love,
Heather ![]()
